
手链编法推荐
手链编法热门文章
更新时间:2021-04-09 19:19关注度: 166100 所属栏目:手链编法
图片:20190916_135741_1569.JPG
700)this.width=700;" max-width:700px;" title="点击查看原图" onclick="if(this.parentNode.tagName!='A') window.open('http://img.36840.com/attachment/1909/thread/19_5024_9a7d4e404ff0b66.JPG');" />
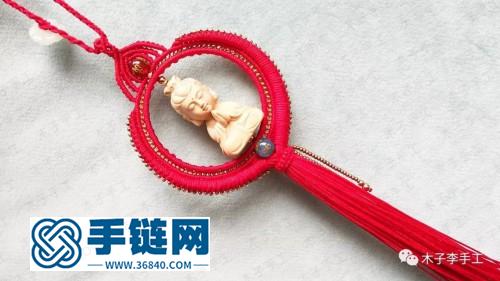
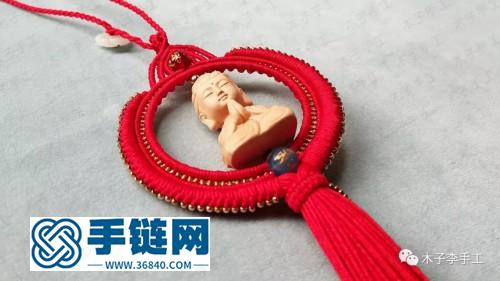
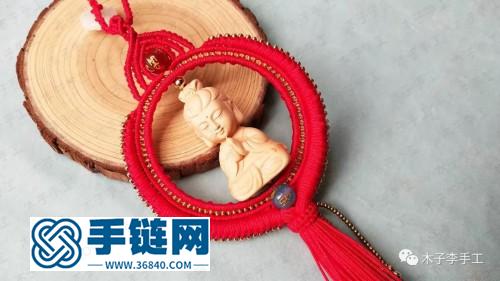
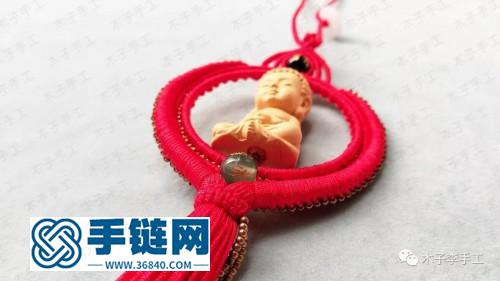
这款车挂用到的基础结:雀头结、斜卷结、平结、四股辫、拧绳,不会的要先去学习哦。
图片:20190916_135741_1615.jpg
700)this.width=700;" max-width:700px;" title="点击查看原图" onclick="if(this.parentNode.tagName!='A') window.open('http://img.36840.com/attachment/1909/thread/19_5024_49c7cc4d0c9e8bb.jpg');" />
图片:20190916_135741_1614.jpg
700)this.width=700;" max-width:700px;" title="点击查看原图" onclick="if(this.parentNode.tagName!='A') window.open('http://img.36840.com/attachment/1909/thread/19_5024_aeba7b74265ee2f.jpg');" />
图片:20190916_135741_1616.jpg
700)this.width=700;" max-width:700px;" title="点击查看原图" onclick="if(this.parentNode.tagName!='A') window.open('http://img.36840.com/attachment/1909/thread/19_5024_5cfa2c29339c596.jpg');" />
材料:
72号玉线红色60cm*44根,30cm1根,50cm2根,100cm*2根
6股金线100cm*1根
铜圈50mm*2个
宝宝佛1个
铜珠2mm120颗左右,3mm2颗,4mm*4颗
六字箴言玛瑙珠8mm*2颗
翡翠转运花14mm*1颗
详细编制教程:
1、2个50mm的铜圈重叠,一根60cm的72号玉线对折后在铜圈上做一个雀头结
图片:20190916_135741_1570.jpg

700)this.width=700;" max-width:700px;" title="点击查看原图" onclick="if(this.parentNode.tagName!='A') window.open('http://img.36840.com/attachment/1909/thread/19_5024_9ec5c3c8bb3c432.jpg');" />
2、得到的两根线都在铜圈上从上往下绕一圈
图片:20190916_135741_1571.jpg
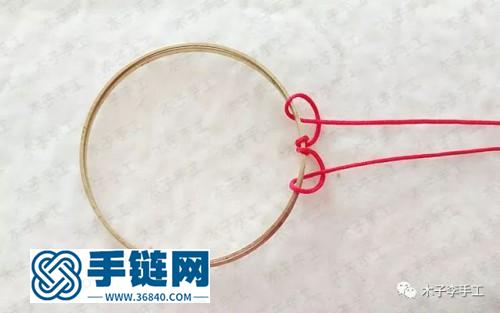
700)this.width=700;" max-width:700px;" title="点击查看原图" onclick="if(this.parentNode.tagName!='A') window.open('http://img.36840.com/attachment/1909/thread/19_5024_bb2c2993c092578.jpg');" />
3、拉紧后的样子
图片:20190916_135741_1572.jpg
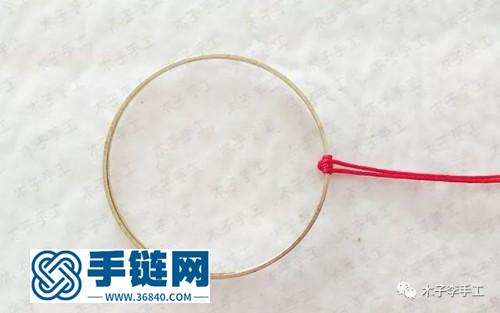
700)this.width=700;" max-width:700px;" title="点击查看原图" onclick="if(this.parentNode.tagName!='A') window.open('http://img.36840.com/attachment/1909/thread/19_5024_4abdf8de54ab992.jpg');" />
4、用同样的方法总共挂40根线得到80根线,分成两组,一边40根
图片:20190916_135741_1573.jpg
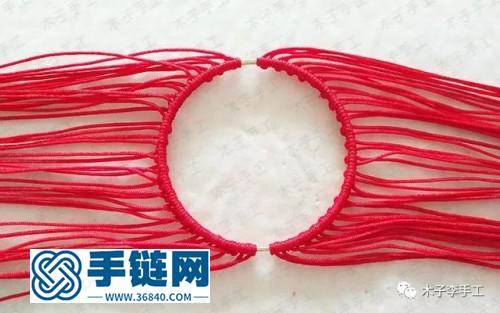
700)this.width=700;" max-width:700px;" title="点击查看原图" onclick="if(this.parentNode.tagName!='A') window.open('http://img.36840.com/attachment/1909/thread/19_5024_1ee39d2bea22f74.jpg');" />
5、加2根60cm的72号玉线,分别在铜圈的空位处做斜卷结,线的两头要留一样长
图片:20190916_135741_1574.jpg
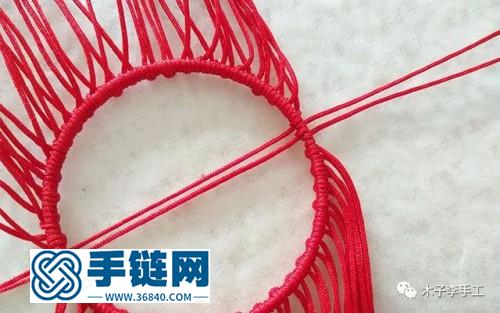
700)this.width=700;" max-width:700px;" title="点击查看原图" onclick="if(this.parentNode.tagName!='A') window.open('http://img.36840.com/attachment/1909/thread/19_5024_8db746ab9d472e2.jpg');" />
6、这2根线在铜圈里面的那头如图穿入2颗铜珠和1个宝宝佛
图片:20190916_135741_1575.jpg
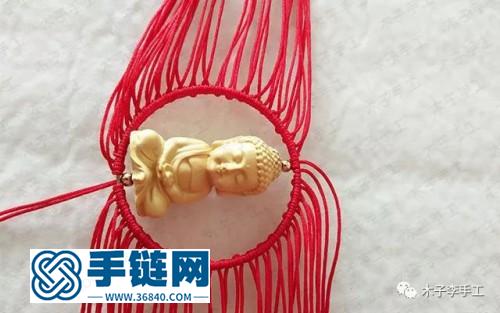
700)this.width=700;" max-width:700px;" title="点击查看原图" onclick="if(this.parentNode.tagName!='A') window.open('http://img.36840.com/attachment/1909/thread/19_5024_ab5f852571a1192.jpg');" />
7、这2根线的另外一头也在铜圈的空位上做斜卷结,要拉紧点,现在总共有84根线了
图片:20190916_135741_1576.jpg
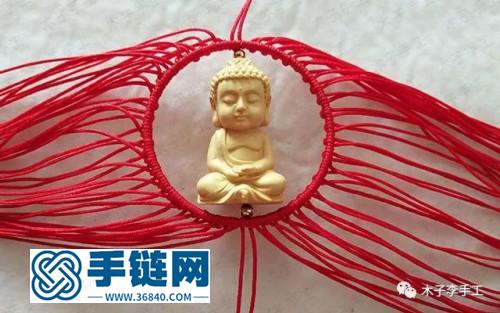
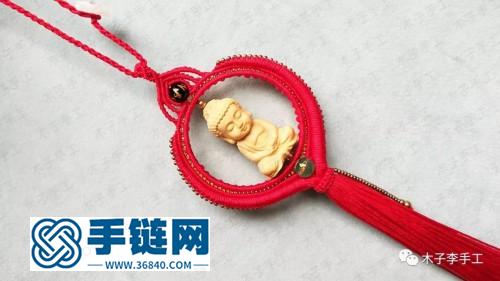
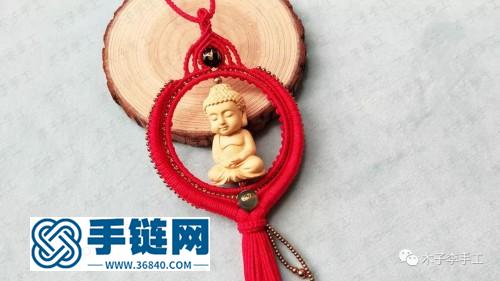
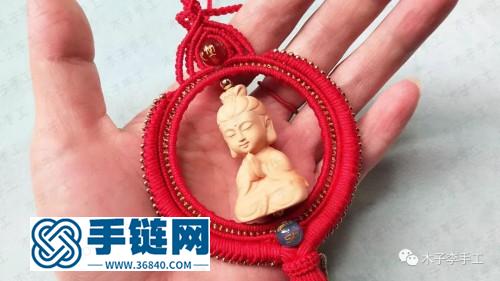
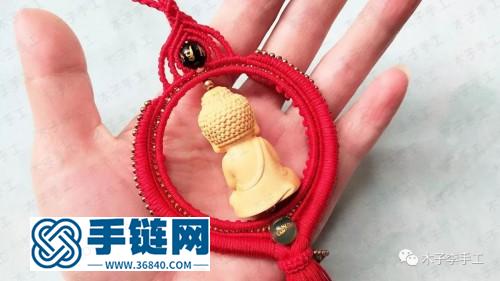
700)this.width=700;" max-width:700px;" title="点击查看原图" onclick="if(this.parentNode.tagName!='A') window.open('http://img.36840.com/attachment/1909/thread/19_5024_61eb0d2895f417d.jpg');" />
8、这84根线全部做轴线,用一根100cm的6股金线在轴线上做一圈斜卷结,开头和结尾都在佛的底部那个位置,每2个斜卷结中间要留一定的缝隙,多余的金线剪掉烫下就行
图片:20190916_135741_1577.jpg
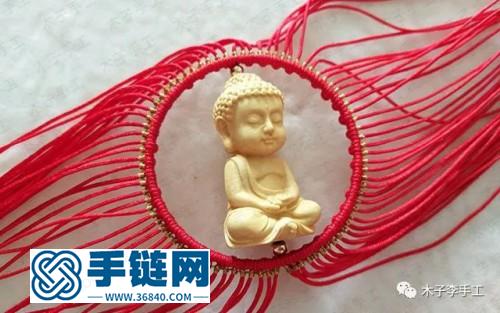
700)this.width=700;" max-width:700px;" title="点击查看原图" onclick="if(this.parentNode.tagName!='A') window.open('http://img.36840.com/attachment/1909/thread/19_5024_872b3ef8b2d7625.jpg');" />
9、加一根60cm的72号玉线做轴线,右边的42根线全部在这根轴线上做斜卷结,斜卷结不要拉太紧,不然会盖住那圈金线,轴线两头的线留一样长
图片:20190916_135741_1578.jpg
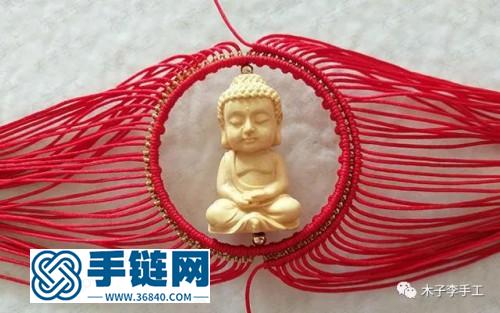
700)this.width=700;" max-width:700px;" title="点击查看原图" onclick="if(this.parentNode.tagName!='A') window.open('http://img.36840.com/attachment/1909/thread/19_5024_a9734c078a40480.jpg');" />
10、左边也是一样的做法
图片:20190916_135741_1579.jpg
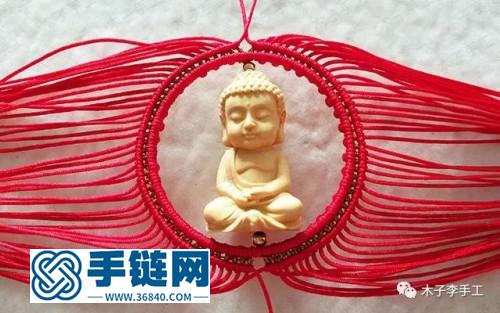
700)this.width=700;" max-width:700px;" title="点击查看原图" onclick="if(this.parentNode.tagName!='A') window.open('http://img.36840.com/attachment/1909/thread/19_5024_36061d5020de020.jpg');" />
11、左边的线都不管,右边顶部留7根线不编,第8根线做轴线,第9根线做一个斜卷结
图片:20190916_135741_1580.jpg
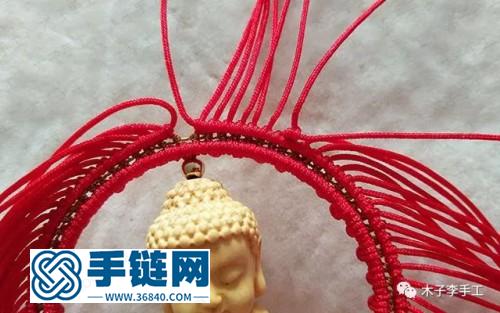
700)this.width=700;" max-width:700px;" title="点击查看原图" onclick="if(this.parentNode.tagName!='A') window.open('http://img.36840.com/attachment/1909/thread/19_5024_915c9734ec758e6.jpg');" />
12、第9根线(做斜卷结的线)穿入一颗2mm的铜珠
图片:20190916_135741_1581.jpg
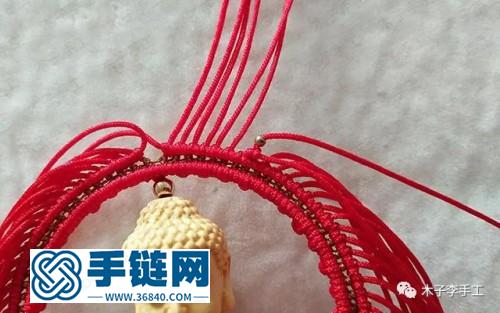
700)this.width=700;" max-width:700px;" title="点击查看原图" onclick="if(this.parentNode.tagName!='A') window.open('http://img.36840.com/attachment/1909/thread/19_5024_869346e8c130cbf.jpg');" />
13、然后跟第8根线一起做轴线,第10根线在2根轴线上做斜卷结
图片:20190916_135741_1582.jpg
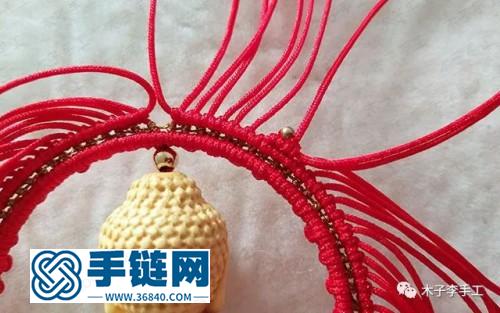
700)this.width=700;" max-width:700px;" title="点击查看原图" onclick="if(this.parentNode.tagName!='A') window.open('http://img.36840.com/attachment/1909/thread/19_5024_4900c42bf690dc7.jpg');" />
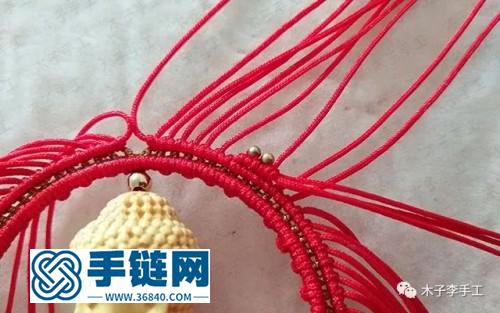
14、第10根线(做斜卷结的线)穿入一颗2mm的铜珠,然后跟第8、9根线一起做轴线,第11根线在3根轴线上做斜卷结
图片:20190916_135741_1583.jpg
700)this.width=700;" max-width:700px;" title="点击查看原图" onclick="if(this.parentNode.tagName!='A') window.open('http://img.36840.com/attachment/1909/thread/19_5024_5853f31748c3805.jpg');" />
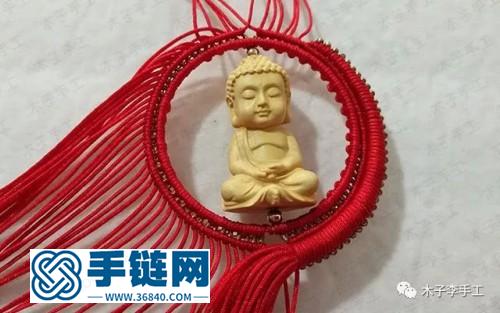
15、后面的每根线都是做了斜卷结后就穿一颗珠子加入到轴线的队列,轴线就会越来越多,这里不明白的建议看视频教程,做完右边的所有线穿了35颗珠子。做的时候斜卷结也不要拉太紧,不然还是会盖住金线
图片:20190916_135741_1584.jpg
700)this.width=700;" max-width:700px;" title="点击查看原图" onclick="if(this.parentNode.tagName!='A') window.open('http://img.36840.com/attachment/1909/thread/19_5024_e1e3d9f5087e367.jpg');" />
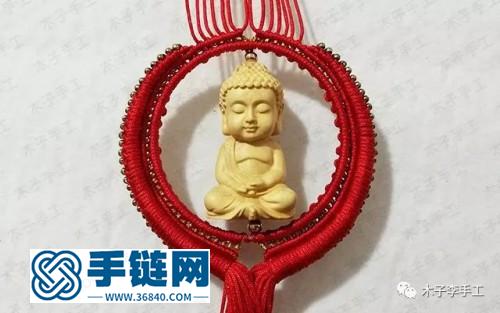
16、左边也用同样的方法做好
图片:20190916_135741_1585.jpg
700)this.width=700;" max-width:700px;" title="点击查看原图" onclick="if(this.parentNode.tagName!='A') window.open('http://img.36840.com/attachment/1909/thread/19_5024_88ebc837f776470.jpg');" />
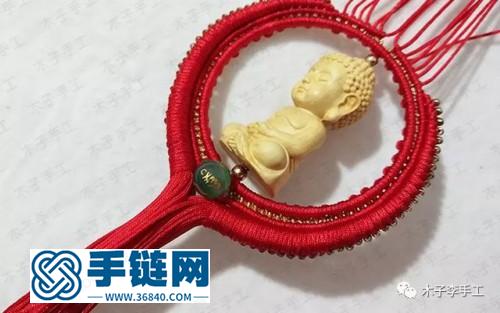
17、用一根50cm的线穿入1颗8mm的玛瑙珠从前往后穿过去遮住底部的洞
图片:20190916_135741_1586.jpg
700)this.width=700;" max-width:700px;" title="点击查看原图" onclick="if(this.parentNode.tagName!='A') window.open('http://img.36840.com/attachment/1909/thread/19_5024_d0a5b3946c0bb6a.jpg');" />
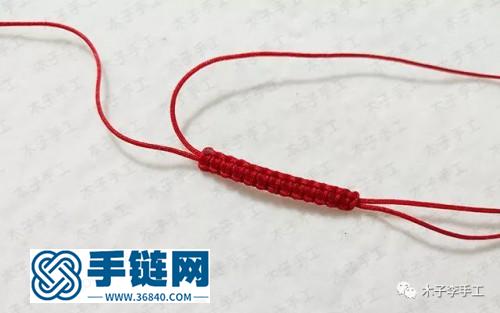
18、一根30cm的线打个圈,50cm的线在圈上做10多个平结,做平结多余的线头剪掉烧粘好
图片:20190916_135741_1587.jpg
700)this.width=700;" max-width:700px;" title="点击查看原图" onclick="if(this.parentNode.tagName!='A') window.open('http://img.36840.com/attachment/1909/thread/19_5024_491a119ad2c753e.jpg');" />
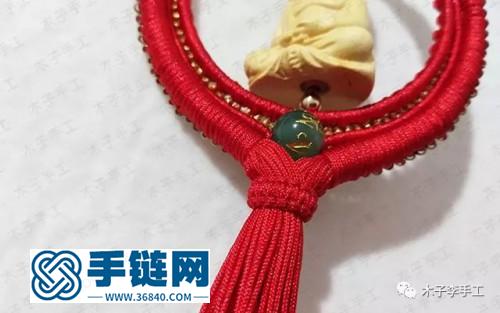
19、把这个平结线圈绑住所有的线,拉紧,再把那一把线一根根拉直,珠子要放平卡在里面
图片:20190916_135741_1588.jpg
700)this.width=700;" max-width:700px;" title="点击查看原图" onclick="if(this.parentNode.tagName!='A') window.open('http://img.36840.com/attachment/1909/thread/19_5024_957b37831bd6a5b.jpg');" />
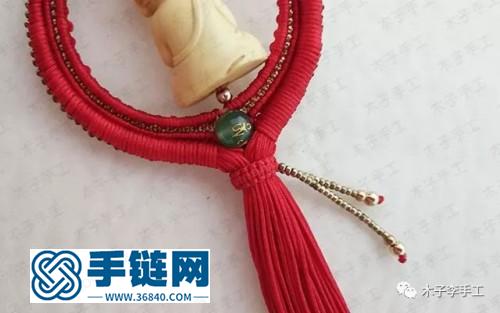
20、平结线圈那两个线头拉到侧边来,穿入适量的2mm、1颗3mm、1颗4mm的铜珠,打个死结固定,珠子不要挨根部太紧,不然珠子不会垂的。
图片:20190916_135741_1589.jpg
700)this.width=700;" max-width:700px;" title="点击查看原图" onclick="if(this.parentNode.tagName!='A') window.open('http://img.36840.com/attachment/1909/thread/19_5024_c2f11eb8496e8bd.jpg');" />
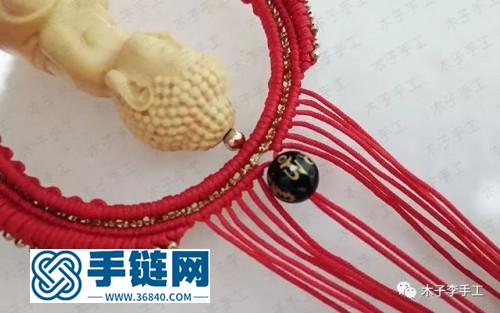
21、开始做顶部,最中间2根线穿入一颗8mm的玛瑙珠
图片:20190916_135741_1590.jpg
700)this.width=700;" max-width:700px;" title="点击查看原图" onclick="if(this.parentNode.tagName!='A') window.open('http://img.36840.com/attachment/1909/thread/19_5024_efa7a6bdfc3588e.jpg');" />
22、左边2根线做一个右斜卷结
图片:20190916_135741_1591.jpg
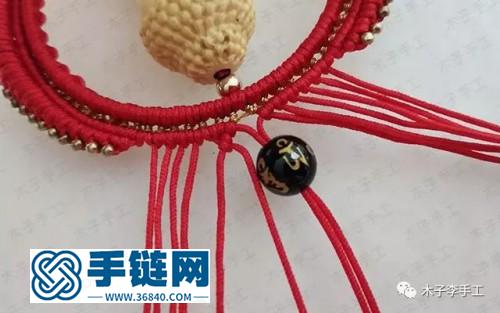
700)this.width=700;" max-width:700px;" title="点击查看原图" onclick="if(this.parentNode.tagName!='A') window.open('http://img.36840.com/attachment/1909/thread/19_5024_f21241fd361deda.jpg');" />
23、再往下绕做半个雀头结
图片:20190916_135741_1592.jpg
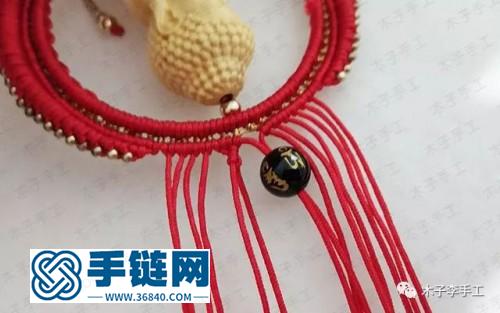
700)this.width=700;" max-width:700px;" title="点击查看原图" onclick="if(this.parentNode.tagName!='A') window.open('http://img.36840.com/attachment/1909/thread/19_5024_2a5277278169248.jpg');" />
24、编4个雀头结
图片:20190916_135741_1593.jpg
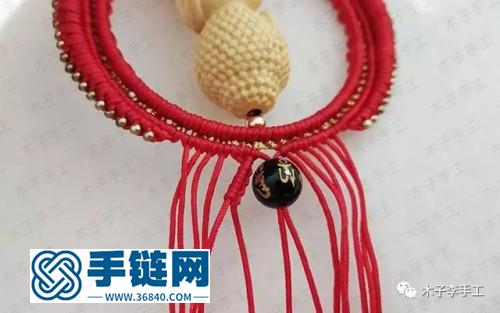
700)this.width=700;" max-width:700px;" title="点击查看原图" onclick="if(this.parentNode.tagName!='A') window.open('http://img.36840.com/attachment/1909/thread/19_5024_b639dd9dab57a44.jpg');" />
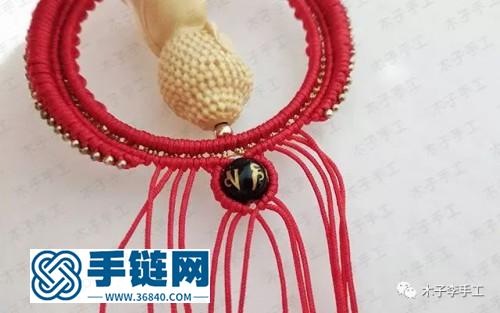
25、穿珠子的其中一根线在这根轴线上做一个左斜卷结
图片:20190916_135741_1594.jpg
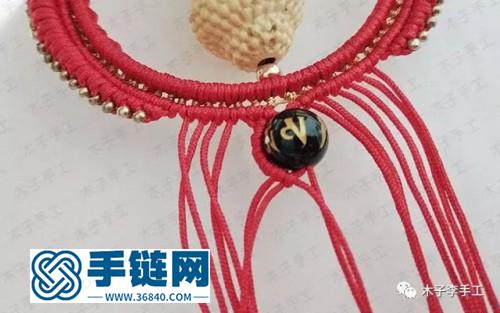
700)this.width=700;" max-width:700px;" title="点击查看原图" onclick="if(this.parentNode.tagName!='A') window.open('http://img.36840.com/attachment/1909/thread/19_5024_a5706d8a3586223.jpg');" />
26、右边也是一样的做法
图片:20190916_135741_1595.jpg
700)this.width=700;" max-width:700px;" title="点击查看原图" onclick="if(this.parentNode.tagName!='A') window.open('http://img.36840.com/attachment/1909/thread/19_5024_3b2ea5bb6def028.jpg');" />
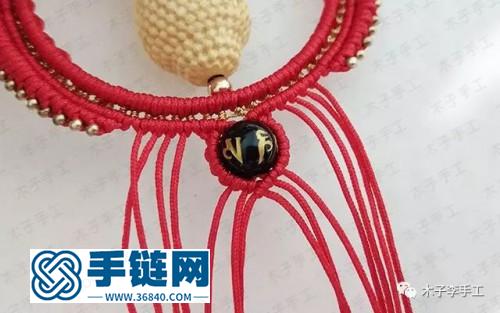
27、2根轴线再做一个斜卷结
图片:20190916_135741_1596.jpg
700)this.width=700;" max-width:700px;" title="点击查看原图" onclick="if(this.parentNode.tagName!='A') window.open('http://img.36840.com/attachment/1909/thread/19_5024_0280e88680f16cc.jpg');" />
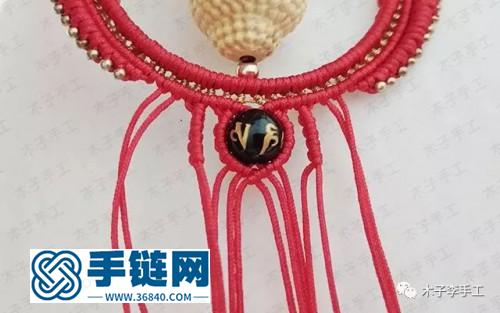
28、两边的2根线也是先做一个斜卷结再做5个雀头结
图片:20190916_135741_1597.jpg
700)this.width=700;" max-width:700px;" title="点击查看原图" onclick="if(this.parentNode.tagName!='A') window.open('http://img.36840.com/attachment/1909/thread/19_5024_49135fed76dd340.jpg');" />
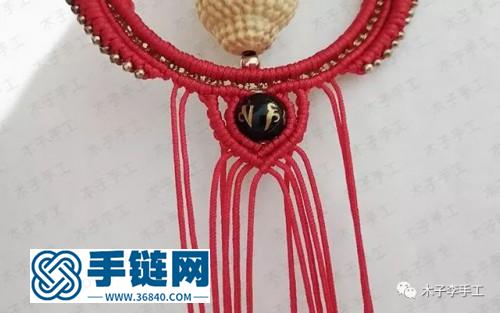
29、用第一层的线在第二层的轴线上分别做斜卷结,两边都一样,两根轴线再做一个斜卷结
图片:20190916_135741_1598.jpg
700)this.width=700;" max-width:700px;" title="点击查看原图" onclick="if(this.parentNode.tagName!='A') window.open('http://img.36840.com/attachment/1909/thread/19_5024_8fa065a4df8a140.jpg');" />
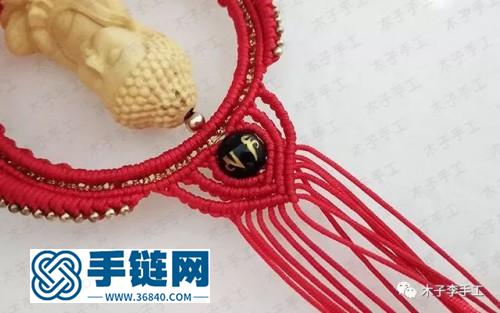
30、第三层也是同样的做法,就是每边雀头结要做6个
图片:20190916_135741_1599.jpg
700)this.width=700;" max-width:700px;" title="点击查看原图" onclick="if(this.parentNode.tagName!='A') window.open('http://img.36840.com/attachment/1909/thread/19_5024_0ff0dc7e107a7fd.jpg');" />
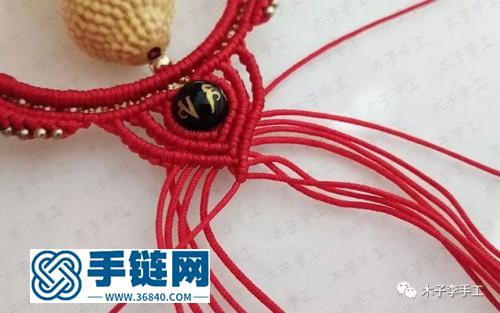
31、左边的2根线做一个右斜卷结
图片:20190916_135741_1600.jpg
700)this.width=700;" max-width:700px;" title="点击查看原图" onclick="if(this.parentNode.tagName!='A') window.open('http://img.36840.com/attachment/1909/thread/19_5024_3bdfeda970e5ec9.jpg');" />
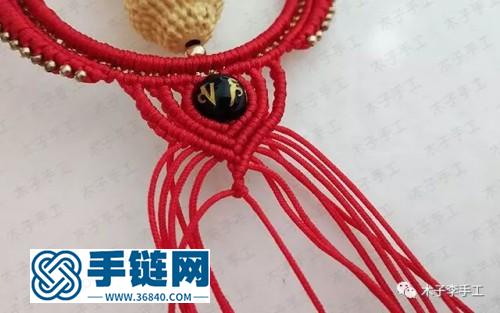
32、轴线绕线不变,再做一个左斜卷结
图片:20190916_135741_1601.jpg
700)this.width=700;" max-width:700px;" title="点击查看原图" onclick="if(this.parentNode.tagName!='A') window.open('http://img.36840.com/attachment/1909/thread/19_5024_85bb1eeeb7ff465.jpg');" />
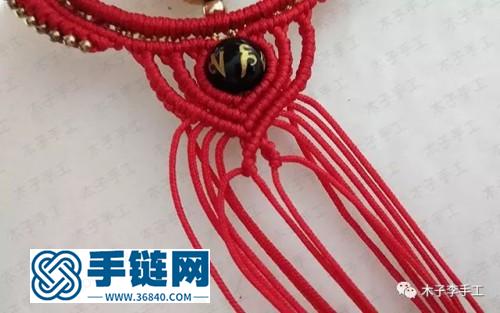
33、右边2根线先做一个左斜卷结,轴线绕线不变,再做一个右斜卷结
图片:20190916_135741_1602.jpg
700)this.width=700;" max-width:700px;" title="点击查看原图" onclick="if(this.parentNode.tagName!='A') window.open('http://img.36840.com/attachment/1909/thread/19_5024_3347eac94aa9a63.jpg');" />
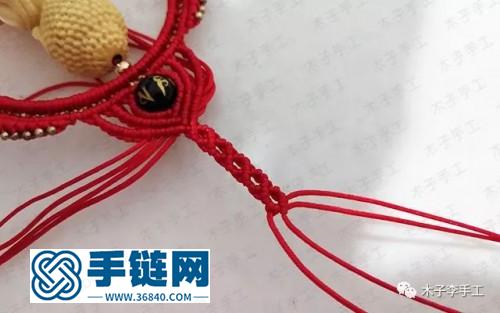
34、两根轴线再做一个右斜卷结,就形成一个四线菱形,做5个四线菱形
图片:20190916_135741_1603.jpg
700)this.width=700;" max-width:700px;" title="点击查看原图" onclick="if(this.parentNode.tagName!='A') window.open('http://img.36840.com/attachment/1909/thread/19_5024_3842a141f933dcc.jpg');" />
35、把四线菱形部分对折,用之前的第一根线拉到后面来做轴线,四线菱形的左边两根线在上面做左斜卷结
图片:20190916_135741_1604.jpg
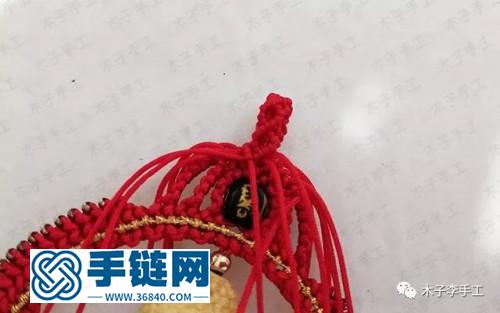
700)this.width=700;" max-width:700px;" title="点击查看原图" onclick="if(this.parentNode.tagName!='A') window.open('http://img.36840.com/attachment/1909/thread/19_5024_f6bb370d40912d2.jpg');" />
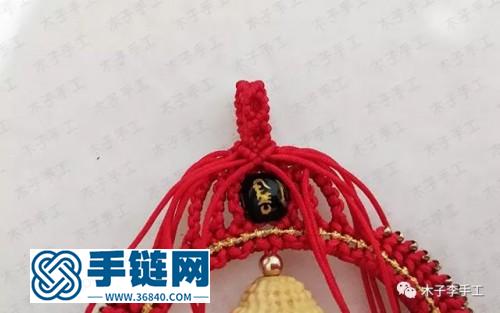
36、右边也一样做右斜卷结,两根轴线再做一个斜卷结
图片:20190916_135741_1605.jpg
700)this.width=700;" max-width:700px;" title="点击查看原图" onclick="if(this.parentNode.tagName!='A') window.open('http://img.36840.com/attachment/1909/thread/19_5024_03a3fc956b17e52.jpg');" />
37、所有的线头剪掉烧粘好
图片:20190916_135741_1606.jpg
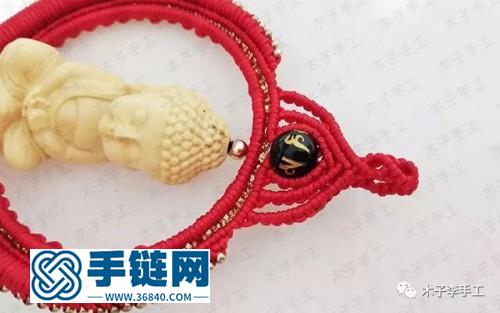
700)this.width=700;" max-width:700px;" title="点击查看原图" onclick="if(this.parentNode.tagName!='A') window.open('http://img.36840.com/attachment/1909/thread/19_5024_4eb51384ba27aeb.jpg');" />
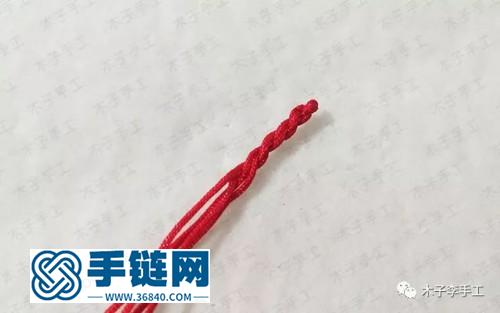
38、开始做挂绳,两根100cm的72号玉线在居中位置做一段拧绳后对折,这是做扣眼的
图片:20190916_135741_1607.jpg
700)this.width=700;" max-width:700px;" title="点击查看原图" onclick="if(this.parentNode.tagName!='A') window.open('http://img.36840.com/attachment/1909/thread/19_5024_17034ed08b86fc7.jpg');" />
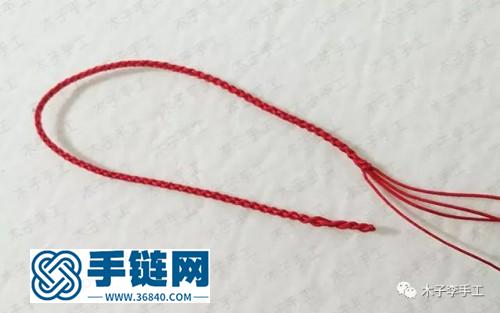
39、然后做一段40cm左右长的四股辫用蛇结固定,也可以不打结
图片:20190916_135741_1608.jpg
700)this.width=700;" max-width:700px;" title="点击查看原图" onclick="if(this.parentNode.tagName!='A') window.open('http://img.36840.com/attachment/1909/thread/19_5024_5fad93428559f9d.jpg');" />
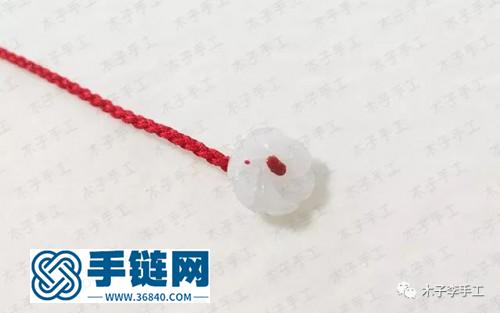
40、4根线头全部穿入翡翠转运花,多余的线头剪掉烧粘好
图片:20190916_135741_1609.jpg
700)this.width=700;" max-width:700px;" title="点击查看原图" onclick="if(this.parentNode.tagName!='A') window.open('http://img.36840.com/attachment/1909/thread/19_5024_7467d539e588ed0.jpg');" />
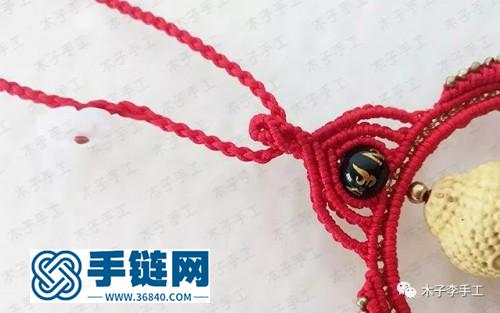
41、把挂绳和主图部分穿起来,这款车挂就做好了。
图片:20190916_135741_1610.jpg
700)this.width=700;" max-width:700px;" title="点击查看原图" onclick="if(this.parentNode.tagName!='A') window.open('http://img.36840.com/attachment/1909/thread/19_5024_a0faabc08121c10.jpg');" />
最下面那一把玉线用来做流苏的,要修剪整齐
图片:20190916_135741_1611.jpg
700)this.width=700;" max-width:700px;" title="点击查看原图" onclick="if(this.parentNode.tagName!='A') window.open('http://img.36840.com/attachment/1909/thread/19_5024_d97aa3ea9ea84e5.jpg');" />
图片:20190916_135741_1612.jpg

700)this.width=700;" max-width:700px;" title="点击查看原图" onclick="if(this.parentNode.tagName!='A') window.open('http://img.36840.com/attachment/1909/thread/19_5024_94e604da1793307.jpg');" />
图片:20190916_135741_1613.jpg
700)this.width=700;" max-width:700px;" title="点击查看原图" onclick="if(this.parentNode.tagName!='A') window.open('http://img.36840.com/attachment/1909/thread/19_5024_21d22e35ded31e1.jpg');" />
图片:20190916_135741_1617.jpg
700)this.width=700;" max-width:700px;" title="点击查看原图" onclick="if(this.parentNode.tagName!='A') window.open('http://img.36840.com/attachment/1909/thread/19_5024_b832047905a7cdf.jpg');" />
图片:20190916_135741_1618.jpg
700)this.width=700;" max-width:700px;" title="点击查看原图" onclick="if(this.parentNode.tagName!='A') window.open('http://img.36840.com/attachment/1909/thread/19_5024_9eb8c335203a91b.jpg');" />
您可能感兴趣的专题教程:宝宝手绳编法宝宝手链编织教程编绳手链车挂的编法图解车挂编绳教程
上一篇:基础中国结盘长结
下一篇:绳编玉线花朵粽子的方法
